Wednesday, November 29, 2006

Swiss Cheese? No Holes, Please!

At a big family party last weekend, my in-laws whipped up a huge buffet feast. One of the great things about French Swiss (and French French for that matter) formal dinners is the cheese course served after the main dish and before (or sometimes in place of) dessert. Here you see an array of Swiss cheeses. Notice the complete absence of holes here. You go from the rich, liquidy spreadableness of the Vacherin (at 12:00) to the solid richness of the Gruyere (at 3:00 and great for melting) to the oozy pungency of a very ripe Reblochon (at 5:00. Ok, so this isn't Swiss; it's from Haute Savoie which is so close to Geneva it's almost a suburb). And then ignore completely the rocky sharpness of the Parmesan (9:00) that we brought up from Italy for the occasion.

A Swiss cheese that deserves it's own special plate and shaving device is the Tete de Moine (Monk's head) cheese that is eaten in paper-thin frilly curls. You might see the logic of the name since the top of the cheese is "bald" while the sides still have their covering.

The cheese that probably gained Switzerland it's holey reputation is Emmentaler. Full of holes and rather sweeter than Gruyere. It's not my favorite but it does go well in a standard cheese mix for fondue: Gruyere, Emmentaler and Vacherin Fribourgeois, all shreddable and very melty. Who's up for fondue?

Sunday, November 26, 2006

Methi-Potato Curry

This is curried potatoes and fenugreek greens. What are fenugreek greens, you might (or might not) ask? They are what you get after you plant the whole spice fenugreek, water faithfully and wait about a month. Each little yellow cube-like seed turns into a shoot about 9 inches long that has about 5 sets of what looks like 3-leafed clover. See image here. Raw, it has a powerful curry-like scent (well if you put your nose up to it). But cooked, it becomes mild and delicious!

I found out about this new cooking green (and great way to use up a whole spice that I usually take YEARS to finish since all my Indian recipes call for 1/4 tsp of it at a time) from Indira of Mahanandi. I wanted a straightforward curry recipe to serve over plain basmati rice and found this one online. Even with some substitutions (canned tomatoes instead of fresh and garam masala instead of Pav bhaji masala) the recipe turned out really really well. It was absolutely delicious. Only one thing, when I went on a strenuous bike ride the next day, I smelled this funny maple syrup/curry smell, and it turned out to be me. Hmmm... I like this enough to eat again but not to eat often. Negatives aside, fenugreek is purported to increase breast size. Now that's a plus!

Wednesday, November 22, 2006

Pumpkin Pie With 3 Gingers and The Best Stuffing Ever

Last year I made my first pumpkin pie and it turned out surprisingly well since I followed a recipe that promised zing but I found that, while it was good, it was still not zingy enough for me. This time I came up with a really spicy, gingery pie that will please all of you who think regular pumpkin pie is a bit thick and cloying. The 3 gingers in this pie are crystallized, fresh and ground. Here's my recipe:

Ingredients:
1-15 oz can of pumpkin puree
1/2 cup sugar
1/2 cup packed brown sugar
3 whole eggs
1 cup heavy cream
2 tbsps rum
2 tablespoons finely chopped crystallized ginger
1 tbsp fresh ginger, finely chopped almost reduced to a paste
1 tsp ground ginger
1 tsp ground true cinnamon (Mexican cinnamon)
1 tsp grated orange peel
1/4 tsp salt
1/2 recipe of this great pie crust (or just make the whole thing and freeze half in a disk for later)

Pre-heat oven to 375F. Roll out the dough to just a bit bigger than your 9" pie tin, place in the tin and put the whole thing in the freezer.

Whisk pumpkin and the 2 sugars together to blend, add each egg one at a time until incorporated. Add all other ingredients (except crust of course) and mix to a uniform consistency. Pour into your crust (mine does really well without blind-baking, but I thing that's due to my pie tin. You do what you think is best.) and place on a rack at the bottom third of the oven. Bake for 1 hour until the center of the pie is set. If the crust is not browning well after 45 minutes, place at the top third of the oven and that should do the trick.
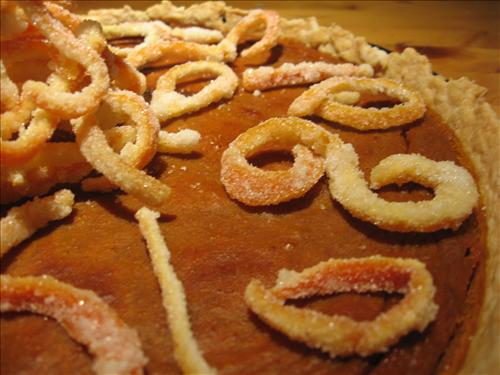
CANDIED CLEMENTINE PEEL
Now for a beautiful and zingy decoration for your pie, make Candied Clementine Peel.
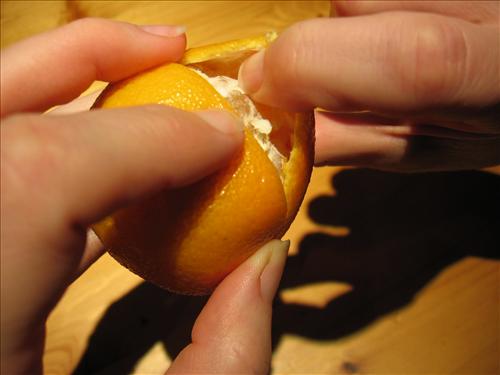
First score the peel of 5 clementines (or mandarin oranges) with a serrated knife as you see here.
Then carefully separate the peel from the flesh with your fingers as so... (Or you can cut the clementines in half and juice them, then pull off the membranes and proceed from there.)

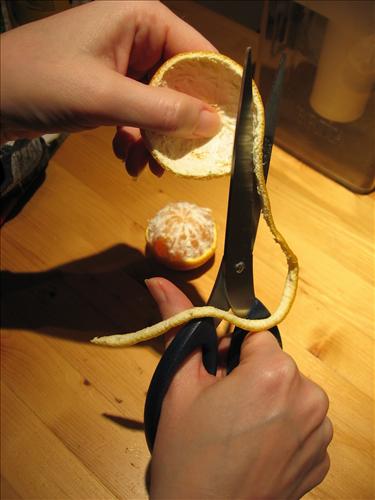
And finally take a cleaned pair of scissors and cut the peel along the rim with one hand while turning the peel with the other to make the longest slice of peel possible. By the time you get toward the center, you will have real curlicues and loopdy-loops which look great on the pie. Hint: Narrow strips of peel are NOT a goal here. Thicker strips not only remain more intact in the long, long boiling and simmering process but also serve for dramatic effect. This does make enough for snacking; I usually munch on the small, broken bits and save the long, culry things for the pie.

Fill a small saucepan with water and add the peel. Bring to a boil, and continue boiling uncovered for 10 minutes. Drain the water and repeat the boiling process with new water. This process helps to soften, sweeten and purify the peel.

Place 3/4 cups of sugar and 1 cup of water in another small saucepan. Bring to the boil and cook until the sugar dissolves. Add the drained peel to the sugar syrup and simmer uncovered for 1 hour.

Put the remaining 1/4 cup of sugar into a wide, shallow bowl. Once the peel has cooked for 1 hour, drain it and quickly roll it in the sugar. If you don't act quickly enough, the peel slices will stick to themselves. Arrange the longer pieces of peel into curly shapes. Remove the peel and set to dry on waxed paper.

*The left-over sugar syrup is wonderful as a sweetener for black tea!

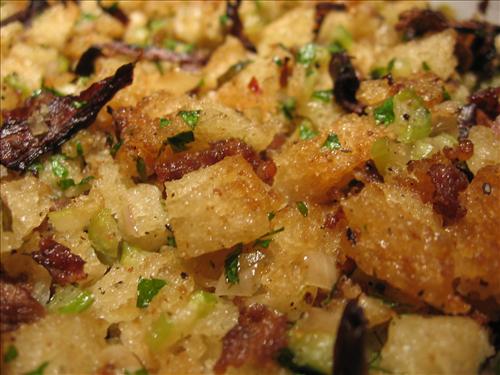
THE BEST STUFFING EVER!
I followed James Beard's Basic Bread Stuffing recipe. This recipe includes loads of suggestions of extras you can add. I took Mr. Beard up on the 1 cup of finely diced celery and 1 cup of toasred walnut halves then in the spirit of improvisation, and considering the fact that last years Porcini Cremini and Pancetta stuffing was a lot blander than it sounds, I added 4 ozs of hot Italian sausage (oh, I reduced the amount of butter called for by 4 tablespoons and kept all the fat from the sausage) and 1 oz of dried porcinis reconstituted in 2 cups of very hot water.

I followed the directions for combining the ingredients exactly then I browned the sausage, dumped it in then added the chopped porcinis, put the mixture into an oval baking dish and into the fridge it went (this was the day before our Thanksgiving). I strained the porcini soaking liquid to get the grit out and reserved that as well. Before baking the turkey, I poured half the porcini liquid onto the stuffing, and put it into a 400F oven. After 30 minutes, I took it out, stirred it around, added the other half of the porcini liquid and returned it to the oven for another 30 minutes. I PROMISE THIS WILL NOT DRY OUT! This can rest on your counter for a couple hours until you have taken out your turkey. While the turkey is resting and you're whisking up your gravy, stick the stuffing back into the oven and it will be warm enough to serve with everything else.
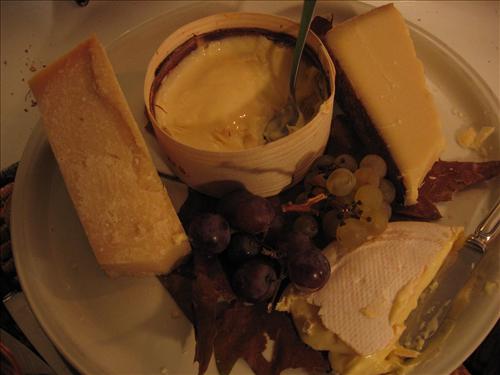
Tuesday, November 21, 2006

Brined Roast Turkey With Sage

Can you see the sage leaf (sort of) lattice design on the turkey breast under the skin here? That was my first attempt at something I saw Martha Stewart do years ago except since she (or her food stylist team) is/are more meticulous than I am, so hers looked a lot more like a lattice. Oh well, there's always next year.

This turkey turned out really well in the tenderness department, especially since by the time I got around to checking the temperature, the meat on the thigh was already at 180F, about 20 degrees higher than my guide said. So it looks like brined turkeys are foolproof!

Here's what I did:

Ingredients for simple brine solution:
1 gallon of water
1-1/2 cups non-iodized sea salt (at 11 cents per kilo, ya can't go wrong!)
1 tbsp peppercorns
4 small garlic cloves, bruised with the side of a knife
ice cubes (optional)
plenty of ice water

2 days before our early Thanksgiving, I brought 1 gallon of water to the boil and added the salt, peppercorns and garlic cloves. You can find more sophisticated recipes for brining that include cider, apples, crystallized ginger, cinnamon, etc. Basically you can add all kinds of crazy crap, but me, I just went simple this time. I boiled that mixture until all the salt was dissolved then I took the whole pot and put it outside to cool as quickly as possible. I used an enormous tamale steamer (looks like the biggest stockpot you've ever seen) as the recipient for this since my turkey was a whopping 16 pounds. (Well, it was "whopping" to the Italian guests who are generally less accustomed than we to Flintstonian meat dishes). I was in a bit of a hurry to get the show on the road so I dumped in all my ice cubes to speed up the cooling process. When the brine was as cool as the outdoors (mine being about 40F that day) I put in the bird, smooshed it down and added ice water to cover. I let it stay that way for almost 2 days until Sunday morning when I prepped the turkey for the oven.


How to make a sage leaf lattice decor on your turkey:
After taking the turkey out of the brine, I dried it off (maybe not as thoroughly as I should have since the skin was not crispy) and began to separate the skin over the breast from the meat. This is a little weird but very easy to do. Once I had made the opening, I took 2 tbsps of softened butter and rubbed it all under the skin. Then I took (16 in my case) washed and dried fresh sage leaves and began to place them diagonally making diamond shapes (oh why didn't I take a picture of this? Why??). The butter helps to keep the sage leaves in place as well as keeping the breast moist. Then the ever-handy Gabriel trussed the thing with the wire we use for whole lamb roasts because I couldn't find the poultry string. He did a great (if not a tad S&M-ish) job!

Roasting the Turkey:
My general guidelines were that a 16 lb turkey takes from 2 to 2.5 hours total cooking time to reach the ideal temperature of 161F. Since my bird was unstuffed, I think that was why it took the minimum.
Then I heated my oven to 500F and put the bird in for 30 minutes at that temp. Then I reduced the heat to 350F and continued roasting for an hour and a half (which was when I decided to stick the meat thermometer in and found the turkey was much hotter that the recommended 161F. So out came the bird and so started the drippings gravy recipe. It's great because it takes about 15 minutes so make the gravy and 15 minutes for the meat to rest so they are both ready at the same time.

Turkey Drippings Gravy: At the bottom of my roasting pan was at least 2 cups of rendered fat and beautiful chestnut-brown fond (the solids you need to scrape off) so I dumped as much as would flow freely into a saucepan then scraped off the rest and added it as well. I put that over medium heat and began to whisk in 1 tablespoonfull of flour at a time until I had added about 1/4 cup of flour (that's for 2 cups of drippings). I let that cool for a couple minutes to avoid the dreaded raw flour taste and then whisked in a total of 3 cups of chicken stock. Music to whisk gravy by: We were listening to Benny Goodman and Orchestra do the rockinest rendition of Sing, Sing, Sing. The pounding bass drums and the ripping trumpets probably scared the pants of the parents of young swing dancers of the day. Now, it's dinner music. Once the gravy got rather thick, I took the pan off the heat, salted to taste and served. This was the second time in my life I have ever made gravy and I have to say it was very rich and meaty-tasting. I'll do the same thing next year.

I thought the butter under the breast skin would have done the trick to make the skin crispy but no dice. I love crispy skin and welcome anybody's ideas on how to get it that way. Should I have saved the 500F for 30 minutes until the end? Should I have basted? Anything else?

Monday, November 20, 2006

Thanksgiving 2006: The Menu

Hooray, I'm back to blogging. Gabriel has been making headway with restoring my computer's old personality so, I'm able to post photos and everything! So above you see the first course of our Thanksgiving dinner, Endive Leaves With Gorgonzola and Walnuts. They are great since they're easy to eat with your fingers, so you can put them out in the living room to distract your guests while you (frantically) put the last-minute touches on these other Thanksgiving preparations:

Here's the rest of the menu:

Endive Leaves With Gorgonzola and Walnuts
*****
Rillettes de Oie (unappetizingly stringy pate stuff, hence no photo) on Toast Points
*****
Wild Rice Soup
*****
Brined Roasted Turkey With Sage (recipe tomorrow)
*****
Pelion Pear Chutney and Cranberry Sauce
*****
(Gabriel's) Mashed Potatoes With (my)Gravy (recipe tomorrow)
*****
Brussels Sprouts With Pancetta and Garlic
*****
James Beard's Bread Stuffing With Sausage & Porcini (I'll tell you Wednesday what I did to doctor it up)
*****
Pumpkin Pie With Three Gingers and Candied Clementine Peel (recipe Wednesday)


Most of the rest of our meal plus some Thanksgiving 2006 reviews: Marco took a guest's-eye view shot of his Thanksgiving dinner plate. The mashed potatoes and gravy at noon were reliably very good, then at 2:00, the Brussels sprouts were, sadly no better than brussels sprouts usually are, despite the Italian kick, at 4:00, my pear chutney was zingy and great with the turkey. At 6:00 the stuffing was fabulous!! And I thought I didn't really like stuffing all that much. Thank you James Beard! 9:00 The Turkey. What can I say? I'll never cook one again without brining it first; it was great! 11:00: cranberry sauce from a can. After a couple Thanksgivings of longing for it, I forgot how boring it is.

Tune in tomorrow for ideas on how to brine and bake a 16-lb turkey and how to make the gravy. Wednesday, Pumpkin Pie With 3 Gingers and Candied Clementine peel, plus some notes on the best stuffing I have ever had.

Saturday, November 18, 2006

Please Stand By...

Ughhhhhhh..... I taught in Como early this morning, came back BY train, metro and bus, then hit the kitchen with a vengeance. Tomorrow's our Thanksgiving, and tonight's 2 parties (yeah, poor us, right?) so I had these 4 hours to make the pumpkin pie with 3 gingers, the sausage-porcini stuffing and the new, New York Times no-knead bread recipe (look it up yourself, I'm too tired to link it.) Boy am I pooped.

Meanwhile Gabriel, the computer genius has uprooted my aged Windows '98 (yeah, as in the 20th century) and replaced it with Firefox but anything on Word, like the recipe for you to make candied clementine peel to top the pumpkin pie with, is as of yet unreachable. Sorry folks. Maybe tomorrow. MAYBE. I'm going to take a 15 minute power nap, then head out for the night. Wish me luck.

Friday, November 17, 2006

Porcini Chronicles Is 1 Year Old Today!

Well, we've hit a milestone. It feels good to have one full year of this blog accomplished. The best thing I've discovered this year are the readers and especially commentors who have made this experience really rewarding. I feel like you all out there are friends. And anyway 1 year of writing this with no interlocutor would amount to a whole lot of belly-button gazing on my part, so thanks for taking an interest!

It has been hectic here but tomorrow I will try to bring you some ideas of Thanksgiving food preparations you can do ahead of time. (We're celebrating Turkey Day this Sunday) I'll bring you ideas on how to brine your turkey if you have a dry meat-fearing husband and zingy pumpkin pie garnishes. See you tomorrow!

Thursday, November 16, 2006

The New Spaghetti Western (Texan, that is): Tracie’s Pasta e Zucca

A few days ago, Tracie of My Life Italian, who is a Texan living in Naples, gave me a recipe to convince me that sometimes fresh pumpkin is worth all the work. Admittedly, I was a bit skeptical since I really hate cutting raw pumpkin. But a friend of the family who is growing several varieties of pumpkin and winter squash, both edible and decorative (see left), proffered me a smallish, edible, tightly-lobed pumpkin as we left their country house last weekend. So there I was with a good, simple-sounding recipe and sort of the right main ingredient.

Ingredients list:
A 2-inch piece of “zucca di napoli” pumpkin (get an idea of how much that is here)
2 garlic cloves
enough olive oil to cover sauce pan plus some for drizzling
6 ounces of pasta (or whatever your definition of “pasta for 2” is)
salt to taste
pinch of red pepper flakes
1 tbsp chopped parsley (or in my case, fried sage leaves)

Here’s Tracie’s explanation of “pasta e zucca”:

hey susan! i'll leave that recipe on this post's comments so maybe someone else will grow a wild hair up their asses and try to make it.

cut a hunk of zucca (please don't ask me how much, about a 2-inch thick slice for 2 people if you want it squashy) into squares (some bigger, some smaller. this way, some will sciogliere and some will maintain a little zucca integrity).

cover the bottom of a pan (keeping in mind that youwill have to add water and pasta) with a healthy helpin of olive oil. let a couple of garlic cloves (halved) flavor the oil and become just blonde.

into the hot oil, add the cubed zucca and some salt. cover the pan and let it go for a couple of minutes.

stir it just enough to keep it from sticking and leave it alone to fry just enough to let some of if brown a little.

when you've gotten a little caramelization going (vedi tu!), add enough water to eventually cover the amount of pasta you want to cook. stir it, salt it, and let it get soft.

when the pieces are soft, add the pasta into the same pan as the zucca and if necessary, more water to cover it all by about an inch. the traditional pasta here is the pasta mista, but i love tubettini integrale. i have to eat the tubes in a secret cave where the food police can't find me, but since your guy isn't italian, you can invent as your sfizio sees fit.

cook it, stirring frequently (mi raccomando! that is, if you don't want to spend the night excavating pieces of cooked pasta from the bottom of your pan) until it's done. it should seem like a clingy, thick sauce, not a soup.

at the end, add pepperoncino if you want, fresh prezz, and a drizzle of evoo.


Result: I screwed this dish up and it was still delicious! I mean delicious enough to start cutting pumpkin for. I had a very lobed pumpkin that would have been impossible even for someone who isn’t me to cut raw, so I cut the thing in half (no small feat!) and baked the pumpkin until al dente and then scooped the still firm flesh out. It got less caramelized than Tracie’s original but was still great. Music to caramelize pumpkin with: the Italian and Texan hybrid stylings of Ennio Morricone, Spaghetti Western film scorist, extraordinaire! I began with what I thought was enough water and added more 3 times during the stirring. That posed no problem either. I had no parsley but fried some sage leaves in the initial oil (with the blonde garlic) and sprinkled them on top in the end, instead. All went great, Gabriel loved it (Tracie, I used pennette and he didn’t even know that was the wrong pasta!)

Tuesday, November 14, 2006

Quince Paste With Ginger, Cinnamon & Allspice

The first time I ever had a thicker-than-jam fruit paste with cheese, it was the Caribbean “pasta de guayaba” or guava paste eaten along with Puerto Rican “queso blanco” offered to me in a college classroom as a sort of culinary culture lesson. And I'm sad to say, it grossed me out. My fault, really. I still had a closed mind about tasting new things and super thick jam with cheese was just too weird for me. Never mind that I’d eat a cream cheese & jelly sandwich in a heart beat. Fast forward over my Spanish experience of hospitable force-feeding at the hands of Mrs. Gutierrez where I had no choice but to start liking all matter of “weird foods”: olives, yogurt, dates, calf’s brains (well, I actually never took to calf's brains), and I’m now a full-fledged member of the non-picky eater community.

These days I love fruit pastes with cheese or with meat, for that matter. In a couple weeks, we’re invited to Geneva for a seasonal dinner of “la chasse” in other words, wild game and those strong “gamey” flavors work really well next to something pungent, sweet and sour. I'm going to another part of the Spanish-speaking world for that: Since the tropical guava is not available in Spain and Argentina, those countries are famous for "membrillo", a fruit paste made from quince.

Quinces look like big, fuzzy misshapen apples. You have certainly seen them in any number of Renaissance still life paintings. They are hard as rocks and must be cooked before eating if you don’t want a mouthful of acrid, sandiness. Cooked, however, they are just lovely! I found a great recipe for quince paste at Beyond the Bland. This particular recipe is unique because it suggests you bake the whole, unpeeled quinces for 2 hours until they’re soft and their skin peels right off. Other recipes I’ve used in the past have you trying your best to get the thin peel off the bumpy surface and then trying to slice the rock-hard flesh to get the seeds out. It’s as bad as dealing with fresh pumpkin! I consider this new way a god-send since it gets the peeling and seeding job is done with minimal effort. I took some of Beyond the Bland's suggestions and left others. I got nice, soft quinces after 1 1/2 hours of baking at 350 F. They suggested using an oven mitt to protect your stirring hand from the hot splatters. I fortunately had no hot splatters but it's a great idea anyway. I followed their stirring instructions to the letter. My ingredient list looks like this:

3 large quince apples
1 cup sugar
1/4 in piece of ginger, finely minced and crushed with the side of the knife
1/4 tsp ground true cinnamon (Mexican)
1/4 tsp allspice

Well, after pouring out the membrillo into a greased, rectangular bread pan and licking the spatula, I have to say this is delicious! Music to taste membrillo by: The release "Pure Guava by Ween. I just hope I got it thick enough. Time will tell. This will hopefully add a nice sweet/sour note to our game dinner.

**New Ideas: I think next time I might just add some savoury spices as well to make a hybrid, fusion Spanish/Indian membrillo/chutney. Imagine this: to the ginger, cinnamon and allspice, add some ground red pepper, cumin and coriander. Pair that with a slice of venison... Mmmm...

Friday, November 10, 2006

Chestnut Honey-Drizzled Ricotta

Ok, ok, I know the photo depicts something more like "Ricotta Inundated with Chestnut Honey" or "Bowl o’ Chestnut Honey With a Little Ricotta on the Side" but the thing is, I’m PMS-ing up a storm here. About this time of the month, I try not to have junk food in the house because, I’m telling you whatever’s here, whether it be one candy bar or a whole cherry cheesecake, is gone within a day. So here I am, twiddling my thumbs simultaneously thanking the lord and cursing the fates that I don’t have any chocolate around when desperation takes over. Music to crave chocolate by: "Iliana quiere chocolate" by Pello Afrokán. On the "Bailar Con Cuba" release. The well-stocked pantry is hiding a jar of bitter-sweet Italian chestnut honey somewhere. There it is, behind the green lentils! What could be more useless than green lentils? And the fridge has got some ricotta! Woo hoo! Ladies and gentlemen, if you have not tried this before, run, don’t walk to your local Italian import store and get yourselves some chestnut honey. This type of honey's dominating flavor is sweet but with a bitter note that rounds out the taste and really makes you want more and more (or is that just me?). Somehow it’s best drizzled or in my case, dumped over a dollop of whole-milk ricotta cheese. Mmm…The bitter-sweetness of the honey melding with the creaminess of the ricotta. Who needs chocolate? (Well, ok, don’t answer that.)

Tuesday, November 07, 2006

Elections, Carrot-Cardamom Bread and a Thanksgiving Survey

ELECTIONS

Happy Election Day to all you U.S. voters out there! Don't forget to vote! I mailed in my ballot about a month ago, so tonight's outcome is a long time in coming for me.

CARROT-CARDAMOM BREAD

Need an elegant accompaniment to 4:00 tea? Well, here’s just the thing, Carrot Cardamom Bread. With carrots, wheat bran and eggs, this tasty treat is almost healthy for you (nevermind the ¾ cup of vegetable oil). At least it's healthier than this pretty carrot cake.

¾ cup vegetable oil (or a combo of oil and applesauce totaling 3/4 cups)
1/2 - 3/4 cup sugar
2 eggs
1 cup grated raw carrots
1-½ cups sifted flour
½ cup wheat bran (not a brand of cereal, just bran that you’d find in a health-food store)
1 tsp baking soda
1 tsp baking powder
1 tsp ground cardamom
¼ tsp ground black pepper
½ tsp salt

Preheat the oven to 325F In a large mixing bowl, stir together the sugar and oil then add the eggs. Mix vigorously, then add the grated carrots and combine. In another mixing bowl, place the flour, bran, baking soda, baking powder, cardamom, pepper and salt. Music to mix dry ingredients by: “Lost in a Supermarket” by my favorite punk band of all time, The Clash. Whisk together and then add to the wet ingredients in thirds. Grease and flour a 9”x5”x3” loaf pan , the pour in the batter. Bake for 1 hour or until an inserted toothpick comes out clean. Enjoy with your afternoon tea. And remember, pinkie up!

THANKSGIVING SURVEY

Ok, here's my problem. I want to make something new this Thanksgiving, having done a turkey roulade (double-butterflied turkey breast rolled over its stuffing and wrapped in pancetta) last year. Gabriel has informed me that he really doesn't like turkey because it's too dry. He'd prefer goose. He did however enjoy last year's pancetta-wrapped turkey since the pancetta kept the bird moist.

So, I'm floating among 3 options:

1) Make the same turkey dish as last year (a little boring to do the same thing).
2) Make goose for Thanksgiving (does that seem sacriligious to you?) or
3) Invent a really moist turkey dish (haven't a clue what that might be).

Any thoughts? Anyone?

Sunday, November 05, 2006

Ravioli di Zucca e Salvia (Pumpkin Sage Ravioli)

Here's another gorgeous, huge Italian pumpkin, of the Neapolitan variety (Zucca di Napoli) That I won't be using in this recipe. It's just that the vegetable looks so much nicer than the can. So if you want to go out and buy pumpkin, saw through it and bake it until it's tender then puree it, be my guest. I'm opening up a can of Pumpkin puree. Anyway, today I've adapted a "The Greens Cookbook" recipe for Winter Squash Ravioli to my own tastes: Canned pumpkin, not fresh squash and a simpler sauce. "The Greens" belongs to the better of 2 general trends in vegetarian cooking. That is to say, they create complex main dishes with only vegetable ingredients. Lots of cheese, lots of beans and lots of work, but the result has been delicious every time I've made something from this book. The other, less desirable general vegetarian trend is the substitution of meat in traditional meat dishes, as in, Thanksgiving Tofurkey with white "meat" and dark "meat" and "giblet" gravy (which, for years, I mistakenly pronounced as Faux Turkey as that name also makes sense), and Mock Duck. If they just called it tofu or seitan, I'd be ok, but the falseness of it reminds me of my traumatic Mystery Meat experiences at the grade-school cafeteria. I just get irrationally queasy at the thought of eating any of this stuff. Anyhoo, so I have a nice, tofu-free pumpkin ravioli recipe for y'all. And as many Italians are dropping the meat dish (il secondo) after the pasta dish (il primo) at least on Tuesday nights, these ravioli along with a green salad, is dinner to me. Here it is:

For pasta:
2 eggs
1/4 cup semolina flour
2 cups all purpose flour
1/2 tsp salt
1 tsp or 2 of water if needed

For filling:
1 tbsp olive oil
1 garlic clove, minced
5 sage leaves, minced
1 cup pumpkin puree
1/2 cup grated parmesan or ricotta salata
salt and pepper to taste

For Sauce
butter (amount up to you)
sage leaves, roughly chopped (amount up to you)
chopped walnuts (optional)

To make the dough, place the flours and salt in a medium mixing bowl and make a well in the center. Crack the eggs into the well and lightly mix them with a fork, incorporating the flour little by little, until you have incorporated all the flour. The dough should be very stiff and on the dry side for the best pasta texture. If you cannot incorporate all the flour, add some water drop by drop until everything comes together. Cover and set aside while you make the filling.

To make the filling, heat the oil over medium heat in a medium non-stick frying pan then add the garlic and sage. Cook for maximum 1 minute, don't let the garlic brown, then add the pumpkin and sautee until the pumpkin has dried a bit, 3-4 minutes. Place the mixture in a small bowl and let cool a bit. Add the cheese and combine. Taste for salt and pepper.

To make the ravioli: I've seen a new and improved way of making ravioli. Maria Teresa taught me this:
Set your pasta rolling machine to the widest setting (for me that's setting 1). Cut off a piece of the dough that's roughly the size of 2 decks of cards, mush it as flat as you can between your palms and roll it through the rollers. Dredge in flour and proceed to setting 2 and so forth until you get to setting 6 (the second thinnest). You should have a very very long oval shaped piece of dough. Lay that out and place a generous teaspoon of the filling every 2 inches toward the edge closest to you, then fold over the other side. Press to seal in between the filling making sure to press out any air bubbles, then press along the long seam. Cut pasta into 2-inch squares with a pizza cutter or knife. IF THESE INSTRUCTIONS ARE CONFUSING, TELL ME AND I'LL TRY TO CLARIFY! At this point, ravioli freeze very well and I usually make a few dinners-worth at a time to use later.

Cooking and serving the ravioli:
Set a large pot of water to the boil, and plop in your ravioli in one at a time. Keep them from sticking to the bottom of the pan or you will have empty ravioli and a bunch of pumpkin floating in the water. I've been there and it ain't pretty. Boil until they begin to float and puff at the water's surface, keep them boiling for 90 seconds more then drain.
While you're waiting for the water to boil, melt about 1 tbsp of butter per person over medium heat in a large frying pan or skillet, add about 2 roughly chopped sage leaves per person and fry until it's crisp. Music to skillet fry sage leaves with: "Hot Skillet Mama" by Yochannon and Sun Ra. The butter will now be infused with sage flavor. Remove the sage pieces and when the pasta is done, drain it and add it to the butter. Toss a couple of times to coat and then serve with the crispy sage leaves sprinkled on top and if you want, also some crunchy, chopped walnuts.

Thursday, November 02, 2006

Feliz (Feliz?, yeah, Feliz!) Dia de los Muertos!…with salsa verde

With Blogger troubles, I bring this post to you 1 day late. Lucky Day(s) of the Dead lasts more than 1 day!Happy Day of the Dead, everybody! Today, we start what in Mexico and parts of Central America is a multi-day festival to celebrate out Dearly Departed. Often in Mexico people will go to the cemetery and will have a meal at their late family member’s tomb. They’ll clean the tomb and also give a little offering to that person, usually in the form of the food they most liked while alive. This is a much happier feast day than you might imagine. It is a celebration of life recognizing that death is one part of it. Mariachi bands make a lot of money over this holiday spreading their joyous, bombastic sounds near and far. Many of you are probably familiar with the irreverent depictions of skeletons dancing, drinking and merry-making that are produced for this holiday.
Well, today, I harvested some of my precious Mexican tomatillos from the balcony (see below) and made the classic simmered tomatillo salsa verde. Again, of course this recipe comes from Rick Bayless’s Mexican KitchenIngredients:
1 lb whole, husked tomatillos
2 serrano peppers (I actually used 1 small, hot poblano ‘cause I have no serrano on the balcony or anywhere else)
1 ½ tbsp vegetable oil
1 medium onion, chopped
2 large garlic cloves, chopped
2 cups chicken stock
1/3 cup chopped cilantro
salt to taste

Boil a medium saucepan of water ½ full, then add the tomatillos and peppers. Cook for 3-4 minutes until they are soft. Drain and cool. Take out pepper stems and seeds. Place tomatillos and peppers in the bowl of a food processor (or blender). In a frying pan, with 1 tbsp of the oil, brown the onion over medium heat. Then add the garlic and cook 1 minute more. Scoop into the food processor along with the other tomatillo mixture. Blend until slightly chunky. In the same frying pan, place the remaining ½ tbsp of oil over medium-high heat. Dump the pureed mixture in all at once and let sear and bubble while stirring to keep things from sticking. Music to sear salsa by: “Pedro Navaja” by salsa great, Ruben Blades. Cook this way for 4-5 minutes. Add the chicken stock, bring to a boil and reduce heat to medium. Simmer this way for 10 minutes. The final texture should be as thick as a standard tomato sauce. Let cool. Taste and add salt and cilantro. Serve with tortilla chips (we have them in Italy!!) or anything you’d like salsa on.


View My Stats